

Update August 9th. 2021: The current Raspi OS versions include Wireguard as a package- so there is no need to build it on its own anymore. I will update this entire article soon with the changed steps.
Lately, due to Coronavirus, many businesses have been obliged to switch how they operate, providing employees the ability to working from home. For a lot of businesses- particularly newer companies, having their infrastructure in the cloud, this hasn’t been much of an issue. But for other business having its IT infrastructure on-premises Corona has been an unpleasant surprise.
For over a year now, I have been freelancing and I have my IT infrastructure both on-premises and in the cloud. To be able to access my whole on-premises infrastructure, I set up a VPN server, which has been very reliable until now.
I began using OpenVPN hosted in my Synology NAS DS216+II, but I always struggled with it working, mainly to updates in the VPN client, which obliged me to reconfigure the tunnel, which was very cumbersome.
So after reading a lot about Wireguard, I decided to give it a try. As hardware, I decided to use a Raspberry Pi, since I have been using them a lot since the first Raspberry Pi was released and I have had excellent experiences with them. Please refer here for more information about the Raspberry Pi.
Currently in its 4th. Generation, it has a chipset based on an ARM 64-bit architecture. Nevertheless, it is used mainly still in 32-bit mode. As the RAM now is reaching 4 GB, it is just a matter of time until 64-bit is the default operations mode.
In this article, I’ll provide you the steps to set up the Raspberry Pi 4 with Raspbian and Wireguard. Most of the steps rely on the information provided on this Reddit thread here and on the information on how to install it from the official Wireguard documentation here.
Wireguard VPN Features
IP Roaming
When changing from a mobile/wired network, the connection is kept alive without needing to reconnect.
State-of-the-art encryption
The algorithms used for encryption are powerful, which is, of course, good since you want to keep the data private
Easy Set-up
Compared to both IPSec and OpenVPN, Wireguard is much simpler to set-up and run. In this tutorial, we will configure the client using a QR-Code, which provides the configuration needed.
Performance
I haven’t benchmarked it myself, but independent benchmarks state that it is more performant than, for example, OpenVPN.
Easier to security-audit
Due to its low amount of code, it is easier to audit than other VPN solutions.
Future Proof
In March 2020, with the definition of the features for the Linux Kernel 5.6, it was decided that Wireguard will be part of the Kernel, which will probably give Wireguard a big push.
There are several different VPN services on the market (IPSec, OpenVPN, etc.), which are difficult to set-up. Wireguard gets rid of these difficulties and provides state-of-the-art encryption while doing so. Raspberry Pi’s 4 popularity makes it ideal as the underlying hardware.
You can find more information about Wireguard here.
Setting up the Raspberry PI4
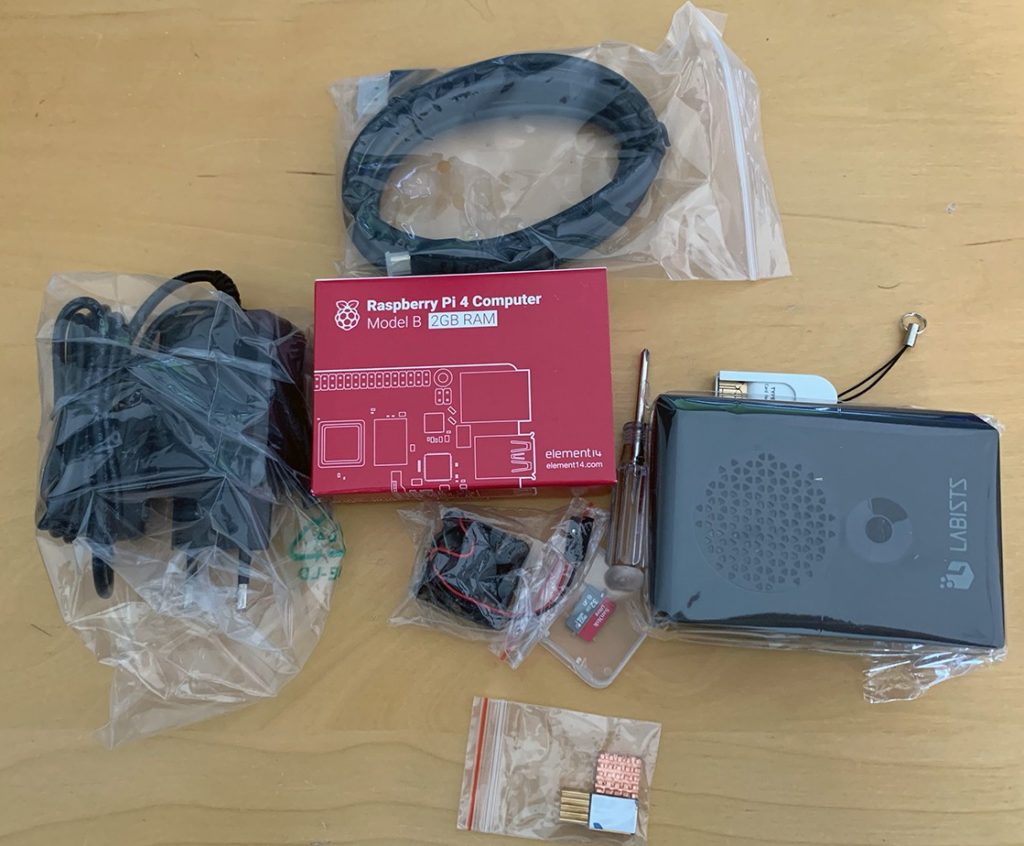
In case you don’t have yet a Raspberry Pi 4, you can buy one online. I purchased a kit since it is more convenient as it includes all you need to have it operating (SD-Card, Power Supply, Heatsink, Fan).

Raspberry Pi4 Kit

Contents of Starter Kit
Prepare SD-Card
Please follow the installation steps for the Raspberry Pi OS here
We will be operating the Raspberry Pi in headless mode; this means the Raspberry Pi 4 will be connected only to our LAN, and we will access it over SSH.
Due to security reasons, SSH is not activated on default, but this can be changed pretty easily.
After copying the image on the SD-card please reinsert it to your computer.
It should automatically mount a „boot“ named volume. In this volume, just add an empty file with the name ssh. In Mac / Linux you can achieve this by changing to the directory and typing
touch ssh
You can configure a lot of parameters of the OS (Wifi usage, Wifi Network, custom network information, enabling 64-bit, etc.) before starting the RPi. For more in-depth information, please refer to here.
I’ll assume that you are using a DHCP server for IP-provisioning in your network. If not, refer to the link provided previously for setting up an IP address manually.
Please retrieve the IP address provided by the server on the admin-console of the router. Since this is router-dependent, please refer to your router’s manual to find out how to do this.
Once you have the IP address, it is time to connect to it over SSH using the „pi“ user, which is provided by raspbian. Assuming you are using Mac / Linux, you can do this by typing.
shh pi@<IP-Address>
In my case, the IP is 192.168.2.112 so I use
ssh pi@192.168.2.112
If everything works fine, you will get a message similar to this:
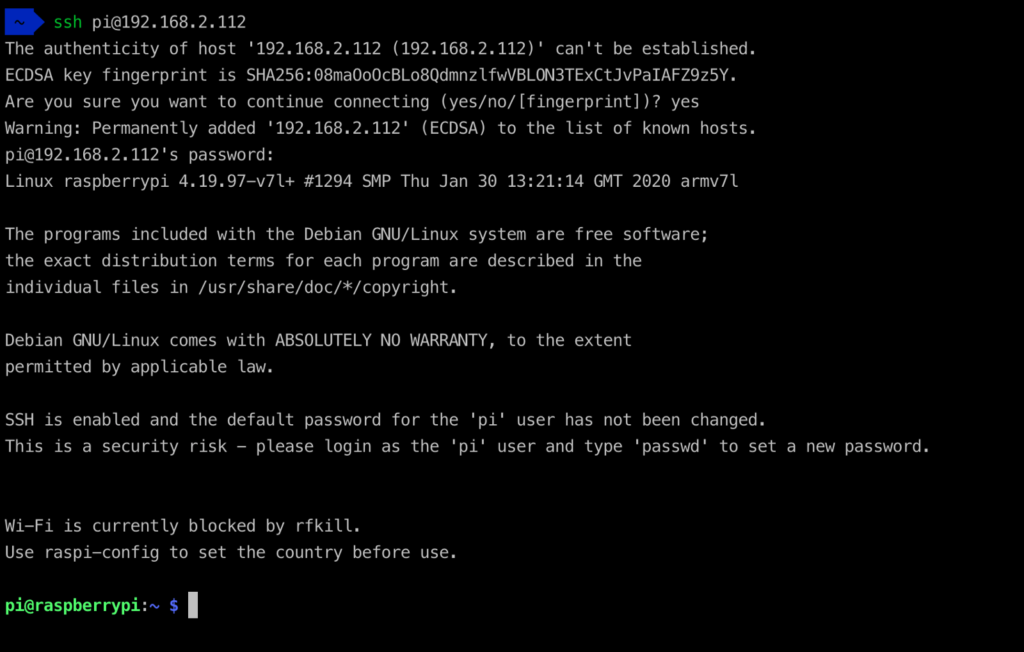
First login in Raspberry PI OS
The default password of the „pi“ user is „raspberry“, which for security reasons, we will change as one of the first steps.
But before doing so, let’s update everything to the latest state:
sudo apt update && sudo apt upgrade -y
Now let’s do some basic configuration. For that type
sudo raspi-config
You will get a menu similar to this one:
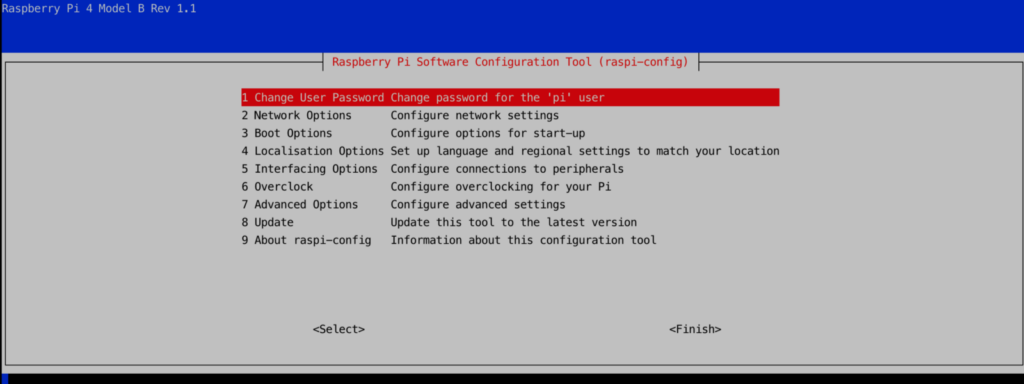
raspi-config menu
- Change the password for the ‚pi‘ user (Option 1)
- Configure the RPi to your timezone (Option 4 ‚Localisation Options‘, then ‚I2 Change Timezone‘)
- Expand the filesystem (Option 7 ‚Advanced Options‘, then ‚A1- Expand file system‘
- Exit raspi-config, which will ask for a reboot.
Setting up Wireguard on the Raspberry PI 4
Now we are ready for the VPN-part of the tutorial. For that we log in with the „pi“ user, using the new password. Then we need to install some extra packages since we will be building Wireguard from source code.
sudo apt install raspberrypi-kernel-headers libelf-dev libmnl-dev build-essential git -y
Now we are reading to clone the source code from Wireguard, compile it and install it:
git clone https://git.zx2c4.com/wireguard-linux-compat && git clone https://git.zx2c4.com/wireguard-tools
make -C wireguard-linux-compat/src -j$(nproc)
sudo make -C wireguard-linux-compat/src install
make -C wireguard-tools/src -j$(nproc)
sudo make -C wireguard-tools/src install
We have to check if IP Forwarding is active, for that, please run
sudo sysctl net.ipv4.ip_forward
If this returns 1, go ahead with the creation of the public / private keys.
If the command returned 0, please run:
echo "net.ipv4.ip_forward=1" | sudo tee -a /etc/sysctl.d/01-custom.conf
and then let the OS reload the config files
sudo sysctl --system
and check that the IPv4 forwarding works:
sudo sysctl net.ipv4.ip_forward
which should return 1.
Thanks to pghpete for providing better instructions as to how to improve the ip forwarding part.
Creation of Public / Private Keys
We will configure Wireguard in the next steps. Before going on, I recommend thinking about the number of clients (physical users/devices) you plan to have using the VPN tunnel simultaneously. For each combination, you will need to create one pair of public/private keys that will be used to secure the communication between server and client. We will nevertheless first go through the instructions for one client only and, in the end, provide instructions on how to create configurations for further clients.
Now we are going to create the public / private keys for the server and one client.
sudo su
cd /etc/wireguard
umask 077
wg genkey | tee server_privatekey | wg pubkey > server_publickey
wg genkey | tee peer1_privatekey | wg pubkey > peer1_publickey
exit
Now that we have the keys, we can create the configuration for both the server and the client.
Server configuration
We create a file called wg0.conf still being in /etc/wireguard with the following content:
[Interface]
Address = 10.9.0.1/24
ListenPort = <ListenPort>
DNS = <DNS>
PrivateKey = [Peer]
#Peer-1
AllowedIPs = 10.9.0.2/32
PostUp = iptables -A FORWARD -i wg0 -j ACCEPT; iptables -A FORWARD -o wg0 -j ACCEPT; iptables -t nat -A POSTROUTING -o <Interface> -j MASQUERADE
PostDown = iptables -D FORWARD -i wg0 -j ACCEPT; iptables -D FORWARD -o wg0 -j ACCEPT; iptables -t nat -D POSTROUTING -o <Interface> -j MASQUERADE
replacing the placeholders <…> with the information as explained below
Parameters
ListenPort = The listening port for Wireguard on the Raspberry Pi.
IP DNS Server = The IP address of the DNS server.
Content server_privatekey = The content of the server_privatekey file created before
Content peer1_publickey = The content of the peer1_publickey file created before
Interface = The Interface name (normally eth0) which is connected to your LAN. This is important so that you can connect to your LAN over the VPN tunnel once the connection is made.
You would need to uncomment the last line (PersistentkeepAlive) in case you are behind a NAT.
Peer (client) configuration
Now we are going to set up the configuration for our client.
For that, we create a file in /etc/wireguard called peer1.conf with the following content:
[Interface]
Address = 10.9.0.2/32
DNS = <DNS>
PrivateKey =<PrivateKey>
[Peer]
PublicKey = <PublicKey>
Endpoint = <Endpoint>
AllowedIPs = 0.0.0.0/0, ::/0
#PersistentkeepAlive = 60
replacing the placeholders <…> with the information as explained below
Parameters
IP DNS Server= the IP address of the DNS Server
Content peer1_privatekey= The content of the peer1_privatekey file.
Content server_publickey= The content of the server_publickey file.
Endpoint=Public IP Address or Dynamic DNS hostname: ListenPort (for example, fictive-hostname.com:45678. Please remember that you will probably need to forward your router’s external to (in the example before 45678) to the ListenPort number configured in wg0.conf so that you can reach Wireguard in the Raspberry Pi.
AllowedIPs= For which destination networks the traffic is going to be routed over the tunnel. In this case (0.0.0.0), all the traffic will be sent through the VPN tunnel.
Configuring client device
To be able to use the VPN tunnel, we need to set up a client now with the configuration used before. In case of setting up a mobile device, we can generate a QR-code with the configuration and read it from the Wireguard App directly. For that, we first need to create the QR-code. For this, we need to install once an application to generate the QR-code and then execute it, providing the configuration file as input.:
QR-Code creation
sudo apt install qrencode -y
sudo qrencode -t ansiutf8 < /etc/wireguard/peer1.conf
With that, we are going to see a QR-code on the console, which we can read with the mobile device. Nothing else is needed for the tunnel to work from the client-side.
Last steps
We are now going to perform some last steps on the Raspberry Pi before we can use the tunnel. We are going to set-up Wireguard as to start automatically after booting and correcting the permissions of the generated files:
sudo systemctl enable wg-quick@wg0
sudo chown -R root:root /etc/wireguard/
sudo chmod -R og-rwx /etc/wireguard/
Please make sure that the Endpoint configured in the peer config file (peer1.conf) is reachable over the internet- meaning that the router is configured to forward the communication to Wireguard on the Raspberry Pi(meaning that you set a forwarding rule for UDP traffic on the configured ListenPort).
After a restart of the Raspberry Pi, the tunnel should be reachable & working from your phone.
Steps for adding another peer
In this case, you will need to create a new pair of public/private keys for the new peer (replacing n with a higher number than the number of peers already available):
sudo su
cd /etc/wireguard
umask 077
wg genkey | tee peern_privatekey | wg pubkey > peern_publickey
chown -R root:root /etc/wireguard/
chmod -R og-rwx /etc/wireguard/
exit
After that, you would append a [Peer] section in the wg0.conf file, modifying the parameters, as explained before. Instead of using peer1_publickey, you would use peern_publickey, though.
Then you would create a new peern.conf file, analogous to the peer1.conf file created before. Now you would nevertheless use peern_privatekey instead of peer1_privatekey.
This new peern.conf file is what you will use to either generate a new QR-code or to import directly on your Wireguard’s client.
I hope you find this information helpful and can enjoy a working Wireguard VPN tunnel at the end.
Dieser Artikel wurde erstmalig in Medium veröffentlicht.